ComfyUI
ComfyUI; Introduction
So, the big boy. ComfyUI is arguably the most versatile and customisable frontend out there, but it’s pretty hard to get into. It’s pretty interesting to me, just because I can try various methods of doing various things, but it’s really hard to just start using; you need to spend hours to get basic functionality. For new users, I highly suggest first picking a simpler frontend like Forge, just to learn basics and have all functions easily available. But for folks who’re interested in what Comfy can do, here’s a detailed section on it. Important. This section is intended for people who have at least some understanding of how image gen works, I won’t be describing every single little detail.
First, ComfyUI is a node-based frontend. All functionality is achieved by adding and connecting nodes. On the left of most nodes, there are Inputs, for example image, latent, clip, etc. In the middle, there are different parameters, like denoising, cfg, checkpoint_name, etc. On the right, there are outputs, like the same image, latent, etc. Keep in mind that most parameters can be also turned into inputs, for example you can connect a node called Primitive to cfg, steps, text, etc. Most nodes can take multiple nodes connected to a single input/output, for example, we connect both Load Checkpoint and Load LoRA to the same model input of KSampler. I'll talk about these nodes later.
ComfyUI; Installation
Windows: Go to Comfy’s Github. Here, go to Getting Started; you can pick either a Desktop Application that will install Comfy as an app (it should be the simplest option), or Windows Portable Package if you want a portable instance. They should be effectively the same, but I personally use the Windows Portable Package.
To update Comfy, go to /update/ and start update_comfyui.bat.
To provide models from another frontend (Forge, in this case) to Comfy, go to /comfy/ and find a file called extra_model_paths.yaml.example. Rename it to extra_model_paths.yaml and open it in Notepad. Find base_path: line under a111: and replace the path/to/stable-diffusion-webui/ string to your A1111/Forge/reForge path, for example base path: E:/Forge/webui.
Linux: Go to Comfy's Github page. Clone the repo. Make a venv somewhere on your computer. After you're done, remember the path to the python file in your venv. I'll be referring to it as path/python. For Nvidia GPUs, run this command: path/python -m pip install torch torchvision torchaudio --extra-index-url https://download.pytorch.org/whl/cu130. After that, run path/python -m pip install -r /path/to/comfy/requirements.txt. As you did that, you can make a .sh file with the following content: path/comfy /path/to/comfy/main.py, and just launch Comfy with that.
To update, either git pull or use ComfyUI Manager. To update requirements, just do the requirements step again after updating your Comfy.
ComfyUI; Custom Nodes
Sooner or later, you will want to use custom nodes. To get them, install ComfyUI Manager by following the instructions on Github. After that, you’ll get a Manager button in your Comfy. Press it —> Custom Nodes Manager, and you’ll be able to download custom nodes. I’ll mention a few of them later, but you’d want to get ComfyUI-custom-scripts as it gives a ton of essentials nodes and it’s a prerequisite for a lot of other custom nodes.
ComfyUI; Building Your Workflow
While there are example workflows available, I highly recommend building your own. This is an incredible learning experience, and you’d know exactly what it does and how it works. For now, I’ll be using default nodes exclusively. Let’s begin
KSampler; The Main Node
 KSampler is a node that transforms latent noise into your image. To find it, you can either RMB —> Add Node —> Sampling —> KSampler,
 or search for it in Node Library.
 Let’s take a look at it and see what inputs it takes, what parameters has and what it outputs.
KSampler; Loading Model
The first input KSampler takes is a model. To load a model, we will use a node called Load Checkpoint.
 There, you can select which model you want to use and output the model, CLIP and VAE. We’ll figure out CLIP and VAE later, but now, let’s connect
 MODEL from Load Checkpoint to KSampler.
KSampler; Positive, Negative and CLIP in General.
Positive and Negative are your Positive and Negative prompts. To load them, we will use a node called CLIP Text Encode (Prompt).
 It inputs CLIP, which we connect to Load Checkpoint, and outputs Conditioning, which we connect to KSampler. You should make two CLIP Text Encodes, one for Positive prompt and second for Negative Prompt. You can recolour and rename nodes, to have them distinct for convenience.
KSampler; Latent Image
Latent Image is the noise that Stable Diffusion resolves into your image. To load it, we will use Empty Latent Image node.
 You just connect Latent output to Latent input of KSampler. There, make sure to select a correct resolution you want your image to be,
 832 x 1216 for example.
KSampler; Parameters
Let’s see what parameters you can configure in KSampler.
- Seed. Selects a seed for your gen.
- Control after Generate. Determines whether Seed changes or not after a single gen, and how it changes. Fixed to not have it changed, Increment for +1, Decrement for -1, Random for random.
- Steps. Regular Steps counter, basically how much times it interacts with the image.
- Sampler Name. The sampler you want to use.
- Scheduler. What scheduler you want to use.
- Denoise. The fraction of image which is turned into noise. Always keep at 1.0 for txt2img, values lower than 1 are needed for img2img.
KSampler; Output and VAE Decode.
When KSampler is done, it’ll output your image via Latent output. To turn this Latent into an image, add the VAE Decode node.
 Connect Latent output of KSampler to VAE Decode, then connect VAE output of Load Checkpoint to VAE Decode, and add Save Image node to connect Image output of VAE Decode to Image input of Save Image. Now, we’re finally done with basic img2img. Configure everything, enter your prompt and press Run at the bottom.
KSampler; Final Result
 This is the bare minimum you need for txt2img gens. From now on, I’ll be less detailed about each node.
Workflow; Separating your Prompt and Quality Presets
First, I’ll specify custom nodes with Node Name (custom-node-pack-title). To download them, just search the name in ( ) in Custom Nodes Manager.
It’s extremely convenient to just enter your prompt in a separate box and have your quality tags applied automatically. To do this, we’ll use String Function node (comfyui-custom-scripts). Add two of them. Then, we’ll use a default node called Primitive. It’s empty at first, but will repeat the input it’s connected to. Connect Primitive to text_a. Then, you can either connect another Primitive to text_b or use Preset Text (comfyui-custom-scripts), connecting it to text_b. In String Function, choose Append in Action and Yes in tidy_tags. Connect String output to text of Clip Text Encode and voila, it’s done. You use Primitive connected to text_a for your regular prompt, and just change Preset Text or another Primitive connected to text_b.

Workflow; Cleaning your Workflow with Pipes
So, there’s a very useful custom nodes pack called comfyui-impact-pack. It’s mostly used for Face Fixing (that I’ll mention later), but it also introduces incredible Pipe nodes. They’re great for an easier way to connect multitude of nodes, especially if you also do Face Fixing and/or Hires.
 First, we have a ToBasicPipe. It takes Model, CLIP, VAE, Positive, and Negative, and outputs a basic_pipe. Using FromBasicPipe, you can output them.
 .
You can also use KSampler (pipe).
.
You can also use KSampler (pipe).
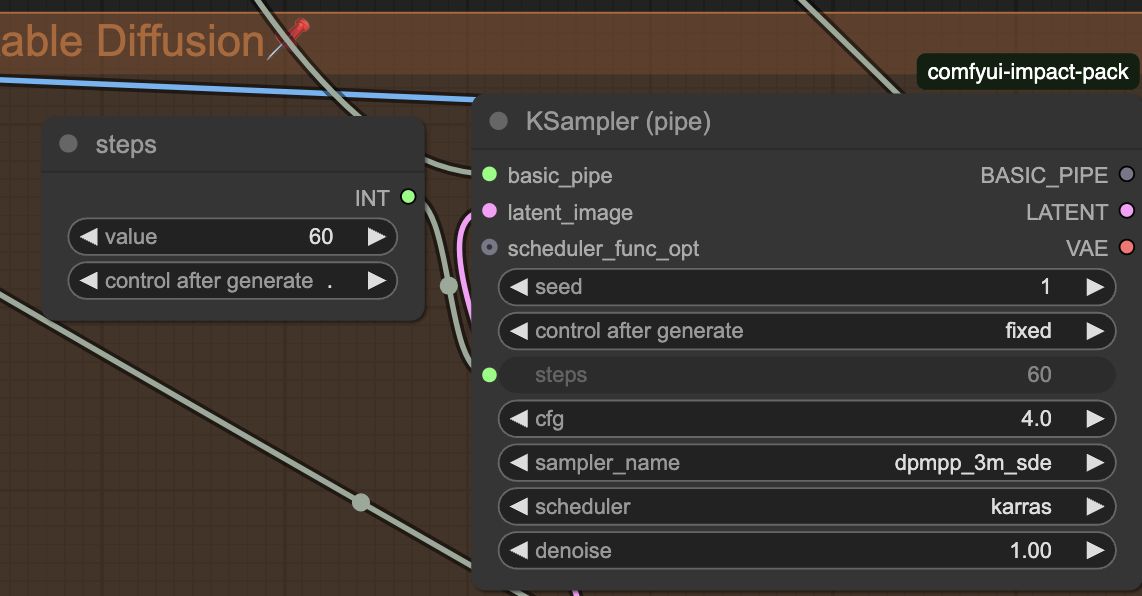 This is extremely useful for more complicated workflows.
Workflow; Face Fixing
For Face Fixing, we’ll use comfyui-impact-pack and ComfyUI Impact Subpack. First, let’s create a FaceDetailer (pipe) node. Then, we make a BasicPipe -> DetailerPipe node. We connect Basic_pipe. Then, we add UltralyticsDetectorProvider, select face_yolo8m.pt and connect BBOX_DETECTOR to BasicPipe -> DetailerPipe. Now we create SamLoader (Impact), leave everything at default and connect SAM_MODEL. Any parameters in BasicPipe -> DetailerPipe don’t need to be changed. We connect detailer_pipe to FaceDetailer. Image input of FaceDetailer needs to be connected to VAE Decode. As for the parameters of FaceDetailer, I suggest leaving everything at default, but changing bbox_crop_factor to 2, so that the area of FaceFixing will not be that big. After that, you connect Image output to Save Image, and we’re done.

Workflow; Hires
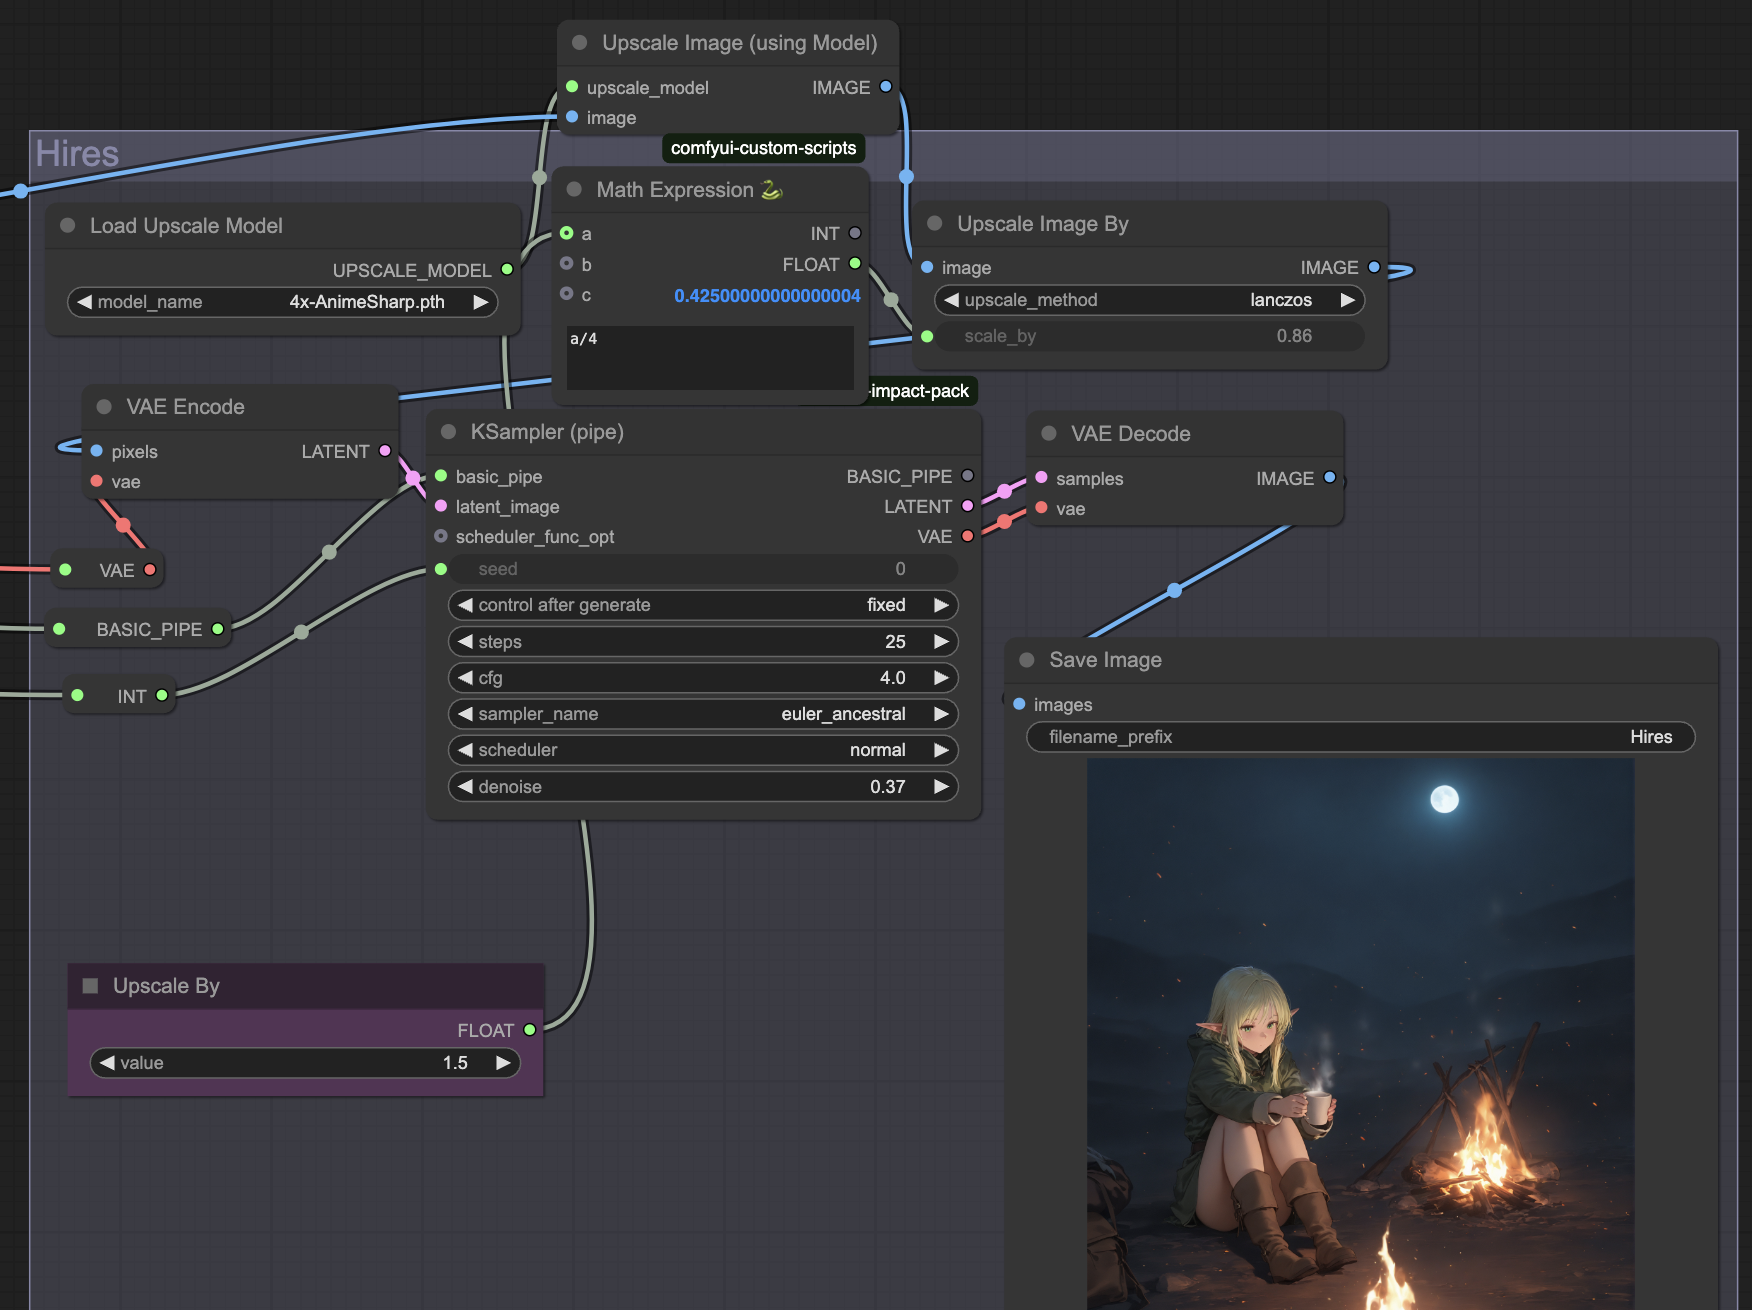
Let’s go to Hires. In my case, this Hires will be going after ADetailer, so the current gen is Image. First, we add Upscale Image (using Model) node. Then we add Load Upscale Model and connect it. In Load Upscale Model, I highly recommend 4x-AnimeSharp. After going through Upscale Image, the gen will be upscaled by 4x. To make it smaller, we’ll use Upscale Image By node. Connect it to the previous node. I suggest using Lanczos as a method. Then, we create a Math Expression node (comfyui-custom-scripts). We create a Primitive for variable a; it’ll be our Upscale By value. As an expression, we enter a/4. This way, we downscale this 4x upscaled image to the result we want, relatively to the original gen. Connect Float of Math Expression to Upscale Image By node’s upscale by variable. Now, we create VAE Encode node to turn our image into Latent, and make a KSampler. Using Latent from VAE Encode to connect to KSampler, we connect basic pipe and choose the parameters: I suggest about 20-25 steps, 3.0 - 4.0 CFG, Euler a Normal, 0.35 - 0.45 denoise. With KSampler, out upscaled image will get touched by Stable Diffusion to make it better. We connect KSampler to VAE Decode, make Save Image, and we’re done. This is how it looks:
Workflow; Regional Prompting
For regional prompting, we're going to need comfyui-impact-pack. First, we need the Sampler node that's going to generate our image; we need to use RegionalSampler node. You can connect Empty Latent Image to it's Samples input. Let's assume we're doing 2 character gens. We create two RegionalPrompt nodes. For each of them, we create Mask Area Rect and KSamplerAdvancedProvider. Connect Mask Area Rect to a corresponding RegionalPrompt.
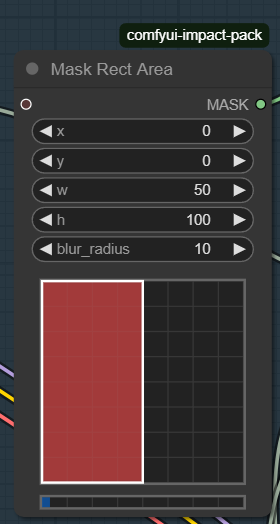
In Mask Area Rect, we choose a part of the image. With 2 character gens, I put w to 50, h to 100, blur to 10 for the first node, and the same for the second, but also doing x to 50. These are percents, so they scale with your image.
Create toBasicPipe for each KSamplerAdvancedProvider. Make separate LoadCheckpoint and two CLIP Text Encode for each. Connect corresponding nodes to their own toBasicPipe, then connect basic_pipe with it's corresponding KSamplerAdvancedProvider. Make sure that each KSamplerAdvancedProvider has the same settings. Do not use anything else but dpmpp_2m or euler or euler_ancestral. Now your RegionalPrompt and KSamplerAdvancedProvider should be fully populated. Create CombineRegionalPrompts node, and connect both RegionalPrompt to it. Then, REGIONAL_PROMPTS output to RegionalSampler's regional_prompts. Now, make a single KSamplerAdvancedProvider, connect a checkpoint and two prompts to it, and connect this KSamplerAdvancedProviderto RegionalSampler's base_sampler input. Make an output, and the workflow is ready. Now, let's talk parameters and what the hell we even did.

First, make sure that each KSamplerAdvancedProvider has the exact same settings. Parameters from txt2img work here, but one important thing: Use no less than 30 steps, and put base_only_steps of RegionalSampler to 1/3 of your total steps; it'll be 10 steps with 30 total steps. Now, about prompts. CLIPs connected to base_sampeler of RegionalSampler are your base prompt. For the duration of base_only_steps, only this prompt is applied to the gen. Your base prompt should have a general outline of the image; for example, 2girls, standing, indoors, cowboy shot, pants,. It's there to make the overall composition, and stop RegionalSampler from messing up the gen. Two pairs of CLIPs connected to your two RegionalPrompts are your prompts for these two parts of the image. Both should be prompted like it's the only character present; for example first prompt is 1girl, standing, looking at viewer, blue hair, smile, elf, maid, and the second is 1girl, standing, looking at viewer, smile, animal ears, red shirt, red hair,. We don't do composition or angles here, as it's already defined by your base prompt, but you may want to transfer styles and artists to each prompt, just in case. Here's the result:

You can get the workflow here, but I highly recommend building your own workflow to understand how exactly everything here works.
Workflow; LoRA
To use LoRAs, we can’t do it like in ForgeUI; Default nodes don’t understand Model and CLIP are connected to Load Checkpoint, and output Model and CLIP are connected to KSampler or ToBasicPipe. As for the parameters, Strength_LoRA is the same as editing weights in Forge/AUTO1111, and strength_clip is a different option I don’t know much about, so play with it yourselves.

Workflow; Groups, Bypass, Activation.
- Groups. These are convenient things to group your nodes. Press Create Node, select nodes with held CTRL, RMB -> Add Selected Nodes to Group.
- Bypass. If you press Bypass in the context menu of a node, or press CTRL + B (CMD + B) on a node, it’ll turn purple. This means that inputs and outputs still work, but the node itself it disabled. It’s useful to disable parts of your workflow, like skipping LoRAs.
- Activation on. While there are a few things with triggers and such I don’t know how to use properly, it works great with groups. For example, if you have a group with ADetailer, you can turn it off as a whole by pressing on the group’s label -> Set Group Nodes to Never. You can enable it back with Set Group Nodes to Always.
Workflow; My Workflow
If you want to download my text2img workflow, you can get it (link later), but I highly suggest making one yourself (go to manager -> install missing custom nodes if you get an error). Figuring everything out yourself is vital for understanding how Comfy and Stable Diffusion work.
UPD: Here's a half-assed update to this section. It's been 6 months, my WF went though a lot of changes, and the old one, described in this guide, gets more and more outdated. As of October 30th, 2025, here's my current WF: Link.
ComfyUI; Conclusion
This is basically it for the base txt2img. I’m still figuring img2img and inpainting, so I won’t be making these sections yet, but it’s extremely similar in principle. I’m not even close to being a pro in Comfy, but I hope it was even a bit useful for beginners.