Installing Stable Diffusion Locally:
Of course, before generating anything, we have to have something to generate it with. While there are numerous sites and services that do it on their servers, they leave you with much less customisation, convenience, sometimes speed, and, of course, they are paid. I'm no expert on these services, I only ever used Civitai just to try Early Access checkpoints, there are a few of them that people on Aegiscord keep mentioning and using, here are two I remember: Pixai.art and Tensor.art There are also Novel.ai, Midjourney and others that are good, but they're not Stable Diffusion and I'm not knowledgable in them at all. These services have little to no customisation or setup required, so there's no point in talking about them specifically. The best option available is, of course, local Stable Diffusion. There is an option to run it from something like Google Colab, but these Colabs come and go as Google bans them, so I can't provide any links. There should be numerous guides about them anyway, just Google it. The purpose of this section of the guide is to explain how to get Stable Diffusion running on your hardware, so let's get to choosing an app for that.
System Requirements
First, let's talk about hardware you need to run SD locally. For PC users, you have to own an NVIDIA GPU with at least 8 GB of VRAM (for AMD GPU users, see SD.Next below). SDXL models use 6 gigabytes of VRAM themselves, and including fluctuations from the ongoing generation, moving models around, and external VRAM usage from Windows or, for example, your browser, total VRAM usage may easily reach somewhere from 7.5 GB to 8 GB max on my RTX 3070 8 GB. It can be possible to run SDXL with 6 GB of VRAM, a lot of frontends have optimisations for that, but be ready for slow generation speed, increased model moving times and CUDA Out of Memory errors. It is technically possible to run SD on just RAM, but it will be so extremely slow it's not worth it at all (but later in the guide I will talk about one method that can make it just barely viable). For two Mac users out there, SD runs on any Apple Silicon chip; the main issue will be the speed of Unified Memory. While it's usually much faster than conventional RAM, it's still far from VRAM speeds, so while it's more than possible and pretty simple to install and run, do not expect high generation speed.
Choosing a Frontend
Let's talk about frontends: they are essentially environments for Stable Diffusion. They offer various performance, compatibility, quality and customisation, which are extremely important. Let's talk about some of the most popular of them: (first, some explanations. IT/s, or Iterations per Second is a metric that shows the amount of generation steps completed in a second. It depends on the Resolution of the image, so all numbers I'll show are from a 832x1216 generation, which is equal to 1024x1024.)
- AUTO1111. The oldest and most known frontend, the good old stable-diffusion-webui. I myself used it as my first frontend years ago during the great days of Stable Diffusion 1.0. Sadly, it is extremely outdated in terms of performance: it offers literally 10x slower speeds than some other options I'll mention. I mention it here mostly for people that remember how good it was, because it's no longer the best option available; only use it if you know exactly why you need it. As a somewhat subjective metric for performance, AUTO1111 gives me just 0.15-0.20 IT/s, which is about 5-6 s/IT. There are forks of it available, for example,
- ForgeUI. A huge fork for AUTO1111 that offers big improvements in terms of models it supports and, most importantly, the performance. It retains the incredible interface of AUTO1111 while providing more in-built features. From my testing, it's the second best performing frontend, giving me somewhere from 2 IT/s to 2.3 IT/s. Note that it has a slimmer extensions support compared to A1111. UPD: finally gave this frontend a proper shot after the death of reForge; it has the exact same performance as reForge and either the same or slightly higher quality of generations. It supports all extensions I use (them being ADetailer, tag-autocomplete and Infinite Image Browsing), so it is a solid choice. Besides that, I don't see any noticeable differences between Forge and reForge, so I'm pretty sure I don't have to rewrite anything in this guide (besides the UI section, but I'm lazy). For newbies and people experienced with A1111/reForge, I highly recommend ForgeUI. This guide will be about it specifically going forward, but 95% of stuff is applicable to anything Stable Diffusion.
- reForgeUI. It's a fork of ForgeUI. It's extremely similar to ForgeUI, but has some advantages over it. First, it fully supports most of AUTO1111's extensions. Second, it shows much less quality loss that I'd estimate at 0% to 5% compared to AUTO1111 and ComfyUI while retaining most of the performance; to me, it's somewhere between 1.9 IT/s and 2.1 IT/s. Third, it's updated constantly, ensuring the most stability and support for new models.
This is a frontend I personally use as my main, and I highly recommend it to you. I'll be talking specifically about it throughout the guide.The development of reForge has ceased, so I cannot recommend it anymore.
Important Update: On 13th of April 2025, reForge ceased development. This means that it will no longer receive any updates, so new foundational models may not work on it. The guide was updated to focus on Forge.
- ComfyUI. Arguably the best, most powerful, most customisable, supported and versatile frontend available. While it lets you do absolutely everything with your generations and receives support for new image and video generation models first, it's extremely complex, difficult and convoluted. Essentially, you're building every single function that you need yourself, from basic txt2img and img2img to Inpainting, Hires and others. There are community made workflows available, so you don't have to figure out and build them yourself, but you'd still have to understand them, switch around between workflows to get different functionality and figure out how to even use them. For all of that, it offers the best quality and performance out of all frontends, giving me about 2 IT/s at full, beautiful quality. If you're willing to spend your time understanding everything Comfy offers, tinkering with nodes, building features and such, it is the best option available, but for a regular user, it might just scare you out of doing anything image-gen or local related ever again. Just know that it exists, and if you feel ready, give it a shot.
UPD: Now this Rentry also features sections on ComfyUI's installation and a basic usage guide. See below.
- SD.Next. More of a honorable mention, this frontend is the only one I know that works with AMD GPUs on Windows and supports AMD ROCm. Stuff like ComfyUI works with AMD GPUs too, but it requires Linux.
Installing Stable Diffusion ForgeUI and Why
So, reForge is no longer in development, meaning that there will be a time when you'd have to switch to something else. For newbies and people familiar with A1111/reForge, I highly suggest using ForgeUI, as it's basically the same. I used it quite a bit for the past week, and, in my experience, it has the same performance and same/slightly higher image quality. To install, go to the Github page and press the One-Click Install button. Unpack the archive, press update.bat, then run.bat; that should be it. You can start SD by clicking run.bat. Keep in mind that you will need ~5 GB of free space for the Forge itself, 6 GB for every SDXL model and ~500 MB for each LoRA you download.
Stable Diffusion XL Models
Let's talk about the most important thing: models we're going to use. First, you should get your models from civitai.com, it has the biggest library of models to download. To search for them, go into "Models", then "Filters" and check "Checkpoints", then "Illustrious" below. Most of these models (especially more popular ones) will be Illustrious 0.1, but there are some new models based on Illustrious 1.0 and 1.1 that are slightly different. To install, just put a .safetensors model file into models/stable-diffusion. Here are some models I recommend:
- Amanatsu 1.1. It's based on Hassaku and made by the same people, and it's incredible. It has a style I adore and it shows some of the best prompt adherence I've seen. Great character knowledge and detail + quite good backgrounds. Works well with Artists, LoRAs and styles. Noticeably outdated compared to recent models, but it's still an extremely solid model.
- Nova Orange. A model I found somewhat recently. While it suffers from a not-so-great prompt adherence, it has maybe the best quality I've seen, in both detail and backgrounds. UPD: at version 9.0, it's one of the best models available, showing a pretty neutral style, great backgrounds, good prompt adherence and general detail.
- Nova Anime. It's a solid model with an alright default style, good prompt adherence and it almost always has recent character/artist data.
- JANKU v5. A very solid model based on Rouwei, but without its insanity. Works with both low- and high-precision samplers, has no issue with CFG++, supports both 1MP and 1.5MP native resolution, has great prompt adherence, and its training data is pretty recent. A very solid model.
- EndFall v1.1 Style B. Gonna be upfront, it's a model I made, so yes, this is shameless self-ad. The main point of this model is a soft, drawn-esque style, without having to resort to prompting to get it. I'd say that the style is most similar to Amanatsu, but it is slightly different; it has better prompt adherence, better knowledge of recent characters and tags overall, and it supports native 1.5MP (1536 x 1536) gen resolution. If you like drawn styles, this model might be interesting to you. Ad over.
The list is not exhaustive. If you want to see other models and what they have to offer, I did quite a few model comparisons on Aegiscord. File sizes of them are enormous, I can't just link them with Catbox, so you can just go to the #image-spam channel of Aegiscord to find my thread called Bex's SD Hub. Link I usually post all my findings and research there first (even if it's mostly just yap).
UPD: I don't do as much model comparisons as I used to when making this section, so it's kinda invalid now. I'm not removing this self-promotion tho :)
What to do once you got it installed
Command Line Flags
This was an important section for reForge, but it's extremely simple with Forge; you basically don't have to use it. One notable thing is: to get your Forge instance accessible from your local network, go to webui folder, and find webui-user.bat.. Open it in Notepad, find COMMANDLINE_ARGS, and add --listen. After that, Forge will be accessible on DESKTOP_LOCAL_IP:7860. In my case, for example, it's 192.168.2.207:7860. On the machine itself, you can always go to 127.0.0.1:7860.
User Interface; Basic Setup
Important Note: This section is mostly the same as it was for reForge, but: I'll cross out sections that are not applicable to ForgeUI, and make bold sections new to ForgeUI. Screenshots are not updated yet. I really should overhaul this whole section, but not yet.
Let's start from top to bottom, left to right. First, the top line of buttons:

- *UI: here, you select the architecture of a model you're gonna use. For Illustrious/NoobAI/Pony, it's always
sdxl. - Stable Diffusion Checkpoint: your current model + you can choose to load another model. Use the Refresh button if you add new models to
models/stable-diffusionwhile SD is running. - SD VAE: to choose which VAE you want to run.
In 99% of cases you want to leave it at Automatic and never touch again.Leave empty in ForgeUI for Automatic. - Diffusion in Low Bits: Right now, I really don't know what it is. I assume it's some optimisation thing. I just leave it at auto.
CLIP Skip: In my understanding, it's the amount of deepest CLIP layers SD skips during Prompt Processing. With SDXL, you almost always want to keep it at 2 and never change again.- txt2img: a tab for creating images from text. We'll be focusing on it throughout the guide.
- img2img: a tab that uses a reference picture for generation in addition to text.
Will explain separately later.Maybe will add a section about it some other time. - Spaces: some ForgeUI feature to install and run tools that are separate from Forge. I won't be talking about them.
- Extras: a tab where extra functions live. Most of the time there's nothing to do there.
- PNG Info: a tab where you can get metadata of your and other's generations and immediately move it to txt2img and other tabs.

- Checkpoint Merger: used for merging different models together. I won't be talking about it.
Train: A very scary section with questionable usefulness. I won't be talking about it at all.- Settings: Self-explanatory
- Extensions: a place where you can turn on/off and download extensions.
Now, second row of top buttons specific to txt2img:

- Generation: our main tab for txt2img generation.
- Textural Inversion: a tab where all your downloaded embeddings live. I don't plan on touching them here as I don't use them, so, a few words about them: from my understanding, you use them to apply Quality tags and such to a generation without actually typing them in as tags. While the idea is cool, I prefer having full control over my generation, and these embeddings do God knows what. If they work for you - great, I prefer not using them at all.
Hypernetworks: a very scary tab I have 0 idea about. I think it's to train models or something? I won't be talking about it at all here.- Checkpoints: a tab that shows all of your models. You can assign images to them by clicking the Edit Metadata button
-->Replace Preview. It'll be replaced with the current image selected in txt2img. To delete the image, go tomodels/stable-diffusionand remove acheckpoint_name.png. - LoRAs: a tab that shows all your LoRAs. You can assign images to them the same way as with Checkpoints.
User Interface; txt2img
Finally, let's talk about txt2img buttons and how to setup them to get to genning quickly. I'll explain most of them later separately and in more detail, this is just to get started.
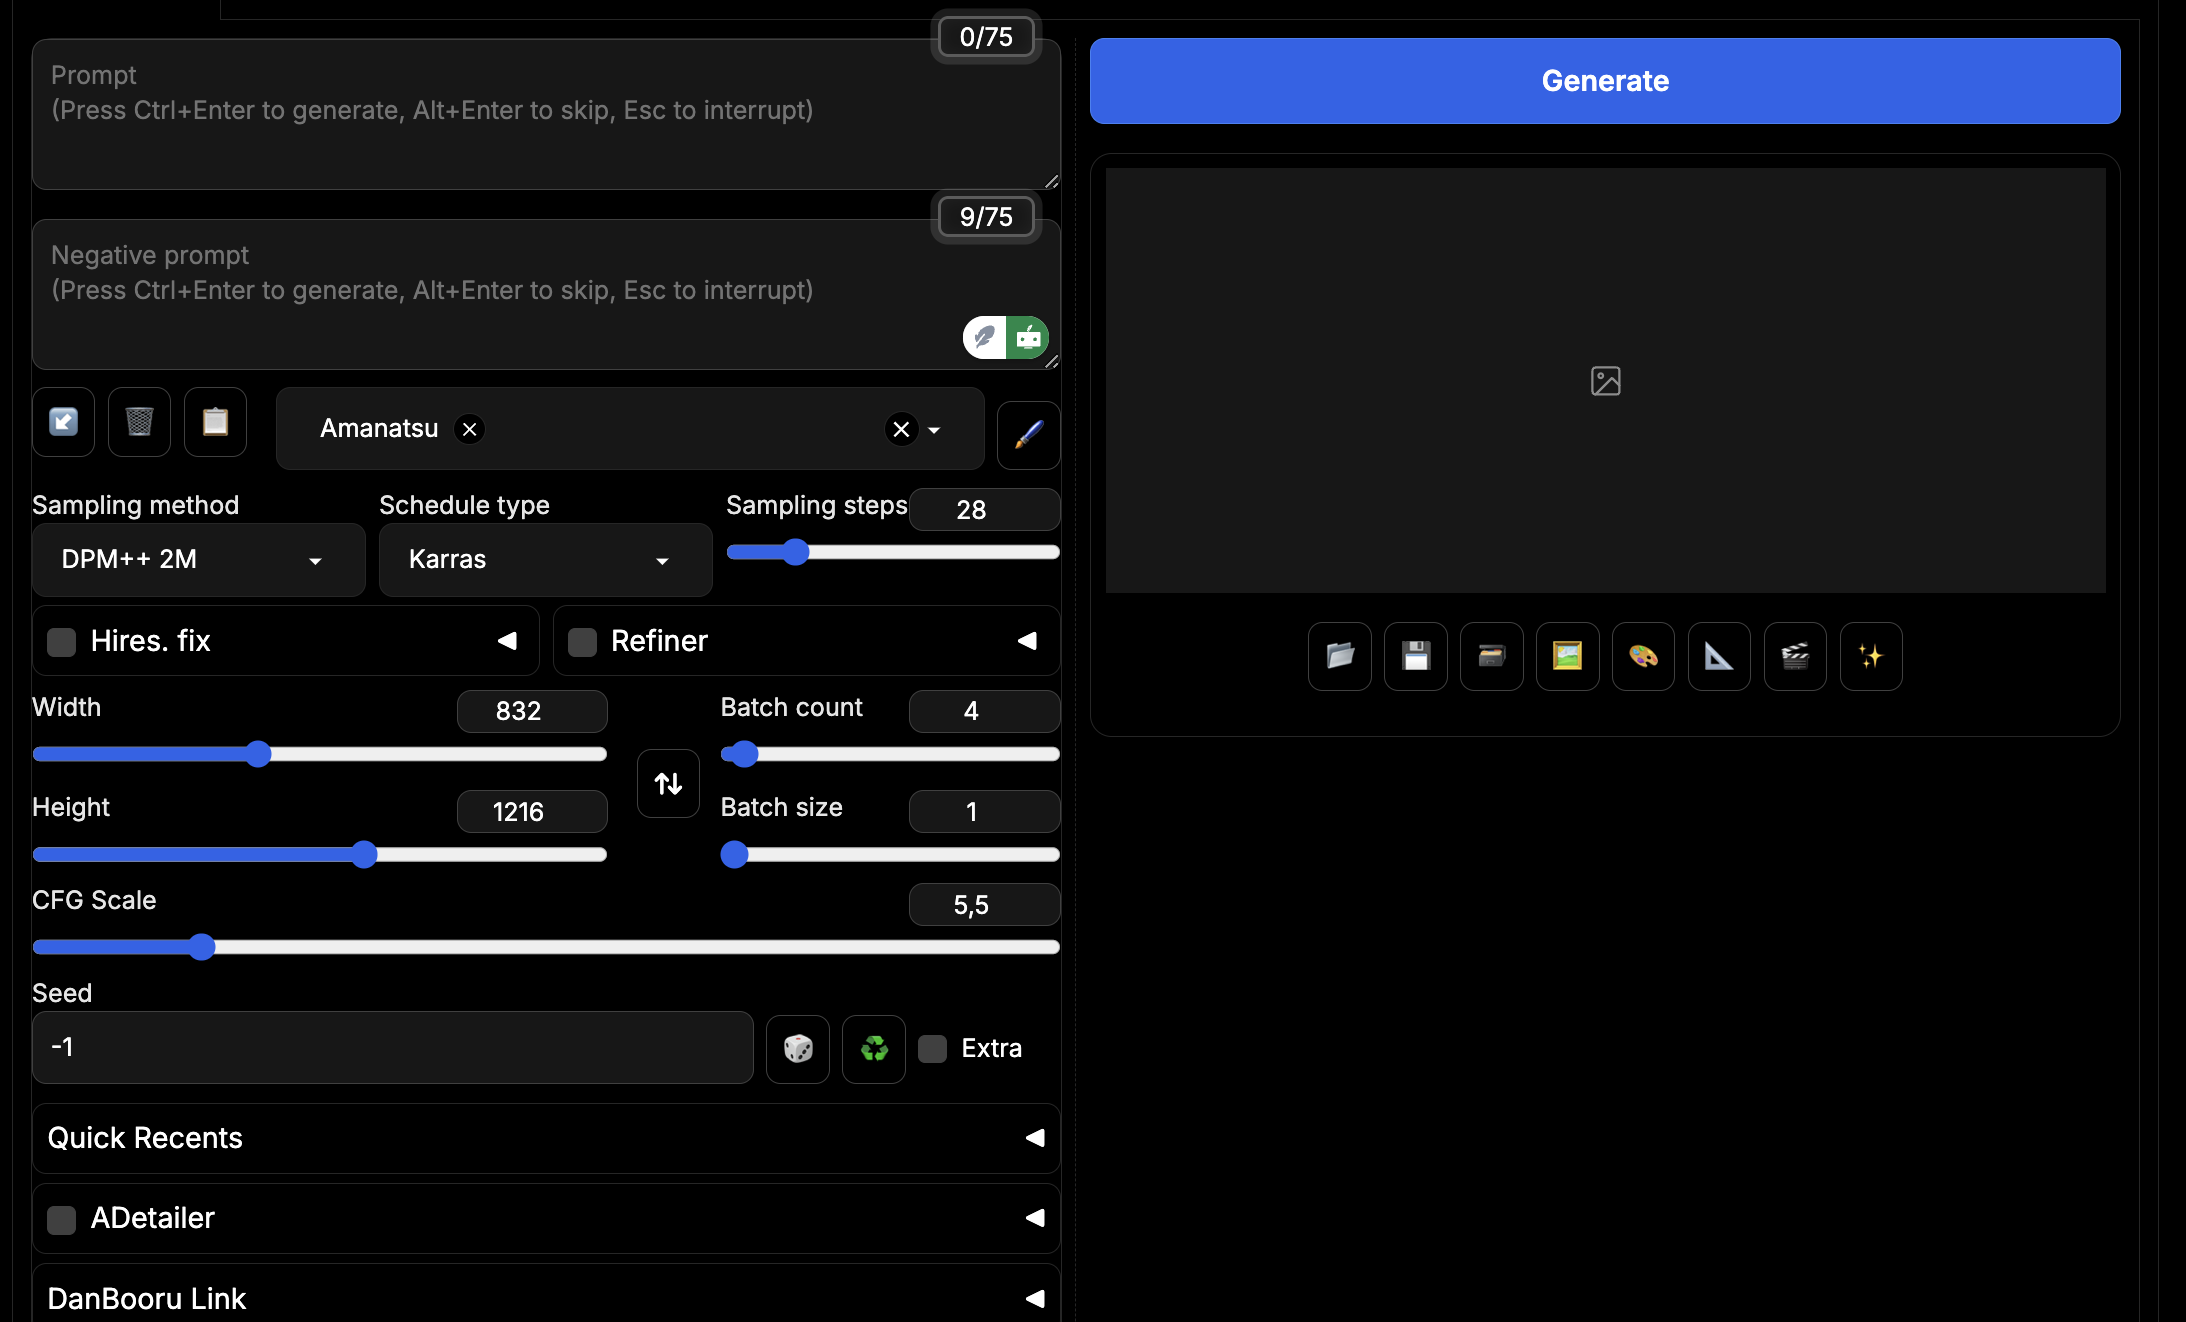
- Prompt: A place where you input your Positive Prompt. At the top right you can see a
0/75indicator: this is the amount of tokens in your prompt out of CLIP's capacity. I'll talk about CLIPs in more detail later, but for most cases, you should aim to not exceed 75 tokens, unless you know exactly what you're doing and how. This is not a hard rule, and if you go above 75, another CLIP will be created, but your prompt has the most efficiency when you're keeping it within the single CLIP. There are a lot of exceptions and cases when you'd want to have multiple CLIPs, but I'll talk about it later. - Negative Prompt: The field where you input your Negative Prompt. You should only have your negative Quality tags there for the most cases. A rule of thumb is, unless you have a specific reason to add them, don't. Negative prompting is very powerful, and being careless can degrade your gens a lot. For example, if you have monochrome images popping of frequently, you may add
monochrometo the negatives; they should have a reason to be there. I'll touch on them in more detail later. - The Arrow Button: inputs your previous generation parameters into the UI. It also works on SD restart. It's great if you refreshed the page.
- The Trash Can Button: Clears both Prompt fields. Can be buggy, I don't recommend using it.
- Notebook Button: Moves prompt from enabled Styles to Prompt fields and disables the Style.
- Blue Spiral Button (usually hidden): It appears if you refresh the page in the middle of the ongoing generation. Allows you to get the prompt, previous settings and images from this gen.
- Styles Field and the Pen Button: It's an option to have a set combination of tags be added to your prompt. You can set them up by pressing the Pen button, you can see an example below. By default, the tags are added like this:
1girl, standing, ...your prompt..., <style>. You can make Style prompt be added to any position of the prompt, by using{prompt}, for example,{prompt}, masterpiece, good quality, amazing quality,.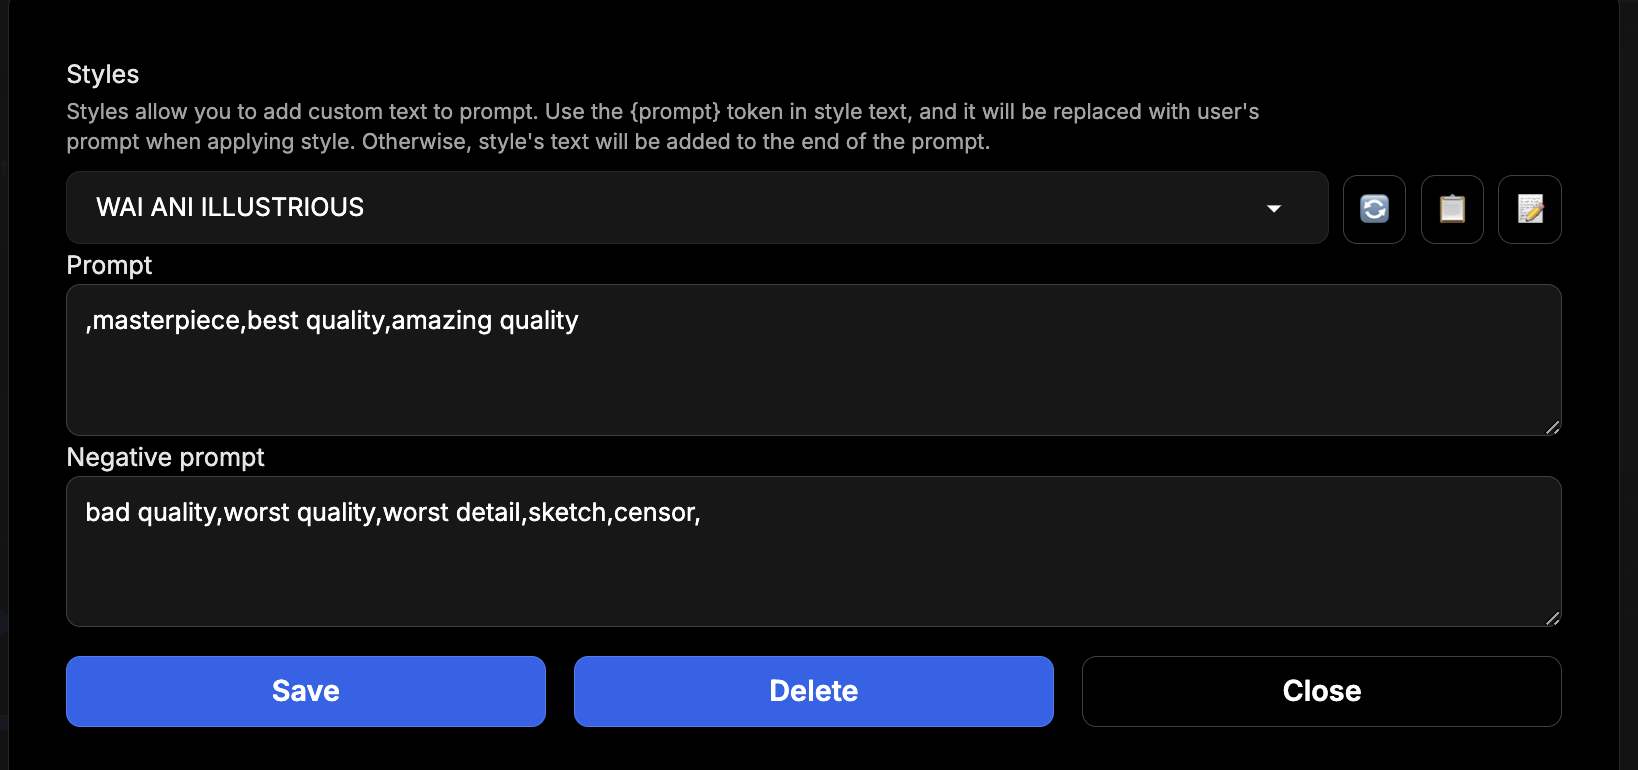
- Sampling Method: This is where you choose your Sampler. While I won't go into what they do exactly, I can recommend using
DPM++ 2M, and, if for some reason it doesn't work on some specific model,Euler a. I'll touch on some other Samplers later. - Scheduler Type: It's a secondary setting for Samplers. With
DPM++ 2Myou should useKarras, and withEuler ayou should useNormal. There are other useful Schedulers I'll mention much later. - Sampling Steps: how many generation steps are done for a single image. I recommend having it from
26to34. I use28,30is also very good. There are methods to drastically reduce the amount of steps needed (thus decreasing the generation time) with Hyper LoRAs, LCM or AYS, see further ahead. - Width and Height: options to set the resolution of your gen. SDXL is trained on
1024x1024images and finetuned on a number of other resolutions. Here is a list of good SDXL resolutions. I personally use either832x1216or1216x832for either Landscape or Portrait, as it's very close to a regular 2:3 aspect ratio. Note that there is no way to natively generate 16:9 images, do not use resolutions like1366x768and such, they will result in artifacts. Refer to the link above to see what aspect ratios are supported. - Batch Count: how many images are generated separately. I recommend using it exclusively unless you have a GPU with enough VRAM to support simultaneous generation of multiple images.
- Batch Size: how many images are generated at the same time. Extremely VRAM intensive and not much faster than generating images one by one, I do not recommend using it. Leave it at 1.
- CFG Scale: A very tricky setting. Basically, the higher CFG is, the more model will adhere to your prompt. With Illustrious models, you get cohere generations in the range from CFG 3 to 7. I recommend using 5 and keeping in mind the option to move it to 4 or 3.5 the more complex your prompt gets.
- Seed: a number that defines your generation. By reusing the exact same prompt and exact same seed from another generation, you will get the (almost) exact same image.
-1for Random (or by pressing the Dice button). Recycle button allows you to automatically enter the seed from previous generation. It's very useful if you want to test LoRAs or models, or Hires/Stylize an already genned image. - Other menus below: These are all the different extensions you have installed. I will talk about some them separately.
- Gallery buttons: You have a set of useful different buttons under the image. They are explained if you hover over them, so I won't be explaining them. Just know that they're there, and that they're useful.
- Metadata: Under gallery buttons there is text. This text is the metadata from the current image; it contains your prompt, generation parameters, extension parameters, etc. This text is useful if you or someone else wants to replicate the exact image you got.
UI Settings
While there is a ton of settings, I want to tell you about some of the most important. I'll be referring to the by their name in the list on the left:
- Defaults: Allows you to save all your current parameters and settings as a default, so that SD will be using them on launch. Press View Changes to see what exactly it'll save, and Apply to save them. Very useful to not have to setup basic things like CFG, Samplers and Resolution each time you launch SD.
- Live Previews: This section is responsible for Live Previews of images that are still generating. While it is extremely useful, it takes a bit of performance away, so if that's an issue for you, turn it off. You can also set the period of Live Previews renders; I use 7, for example, because I always use 28 Generation steps, so I get a preview every quarter of the generation. You can also change the Preview Method; I use TAESD, as it's almost doesn't have quality degradation from it being a preview and I didn't notice much of a performance loss.
- Infotext: allows you to disable writing generation metadata into the image. While I'm all for image gen being an open-source, completely collaborative hobby where we all learn from each other to improve, people should have an option to hide their generation parameters and prompts from others. Feel free to do so.
- Paths for Saving: allows you to change the folder to where SD saves your generations.
These are most notable settings. Feel free to explore them yourself, I could've easily missed something important.
Extensions
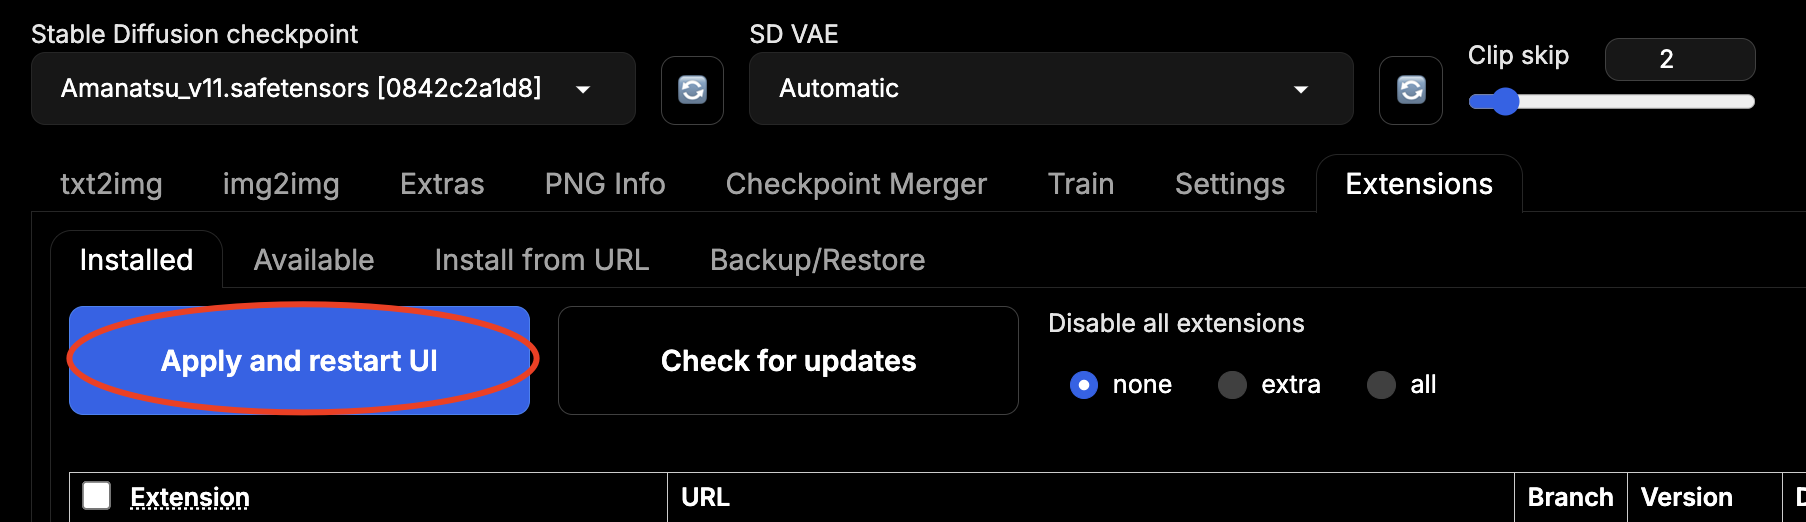
While base Forge is more than enough for most stuff, there are some very useful extensions you can download. First, how to install them. Go to the Extensions tab, then press the Available tab under it and press the big blue Load From button. It will give you a list of all the available extensions. Once you installed it, go to Installed tab and press Apply and Restart UI.
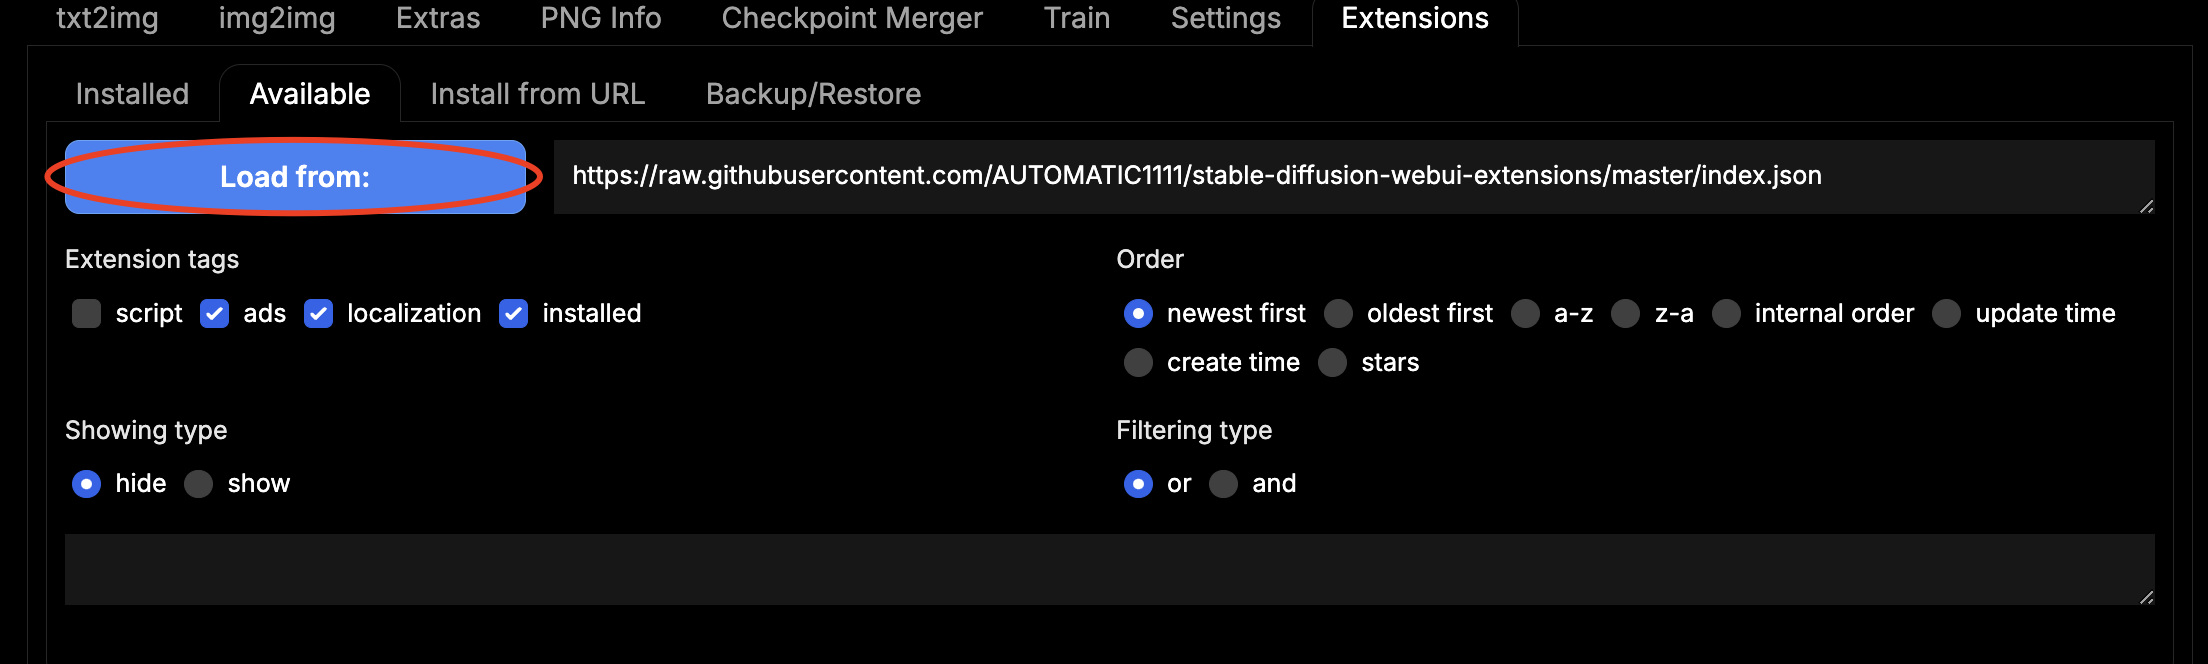
 Note that if you're using
 --listen, Forge will not allow you to install, enable and disable extensions. Remove the arg, do what you need with the extensions and put it back. Now, some cool extensions:
Booru tag autocompletion prompting: it functions as an autocomplete for Booru tags, containing, I think, literally all of them. Very convenient and useful even if you already memorised them. You can press Tab to put in the top result and arrows to move between results. On pressing Tab, it also auto-formats(brackets)into\(sd-recongisable brackets\)and auto-removes_underscores_. Very cool.
ADetailer: an essential extension for almost everyone. What it does is: once the image finishes generation, it automatically detects any faces and re-generates them in full resolution, resulting in crisp and detailed faces in any situation. It doesn't require any setup; you just install it, enable and voila, now character faces look beautiful.Regional Prompter: I never figured it out, but a few people on Aegiscord mention it from time to time and show impressive results with it, so I'll mention this extension too. What it does is: it separates the image area in X areas and generates characters separately for each one. It's extremely useful for multiple character gens, but is completely unintuitive and I didn't have enough patience to learn it; Illustrious is capable of generating 2 or 3 characters by itself with some tricky prompting I'll talk about in detail later. If I ever learn this extension, maybe I'll expand this section or make a new one.Infinite Image Browser: An incredible tool to view, sort, tag, organize and compare all your generations. It indexes and views everything in youroutputs(or any custom) folder. You can see a showcase of this extension on it's github page. I highly recommend giving it a shot; it's one of my essential extensions now.
We're ready?
I think that's all the technical stuff need to know to get to image generation with Forge. Let's get to the deeds.